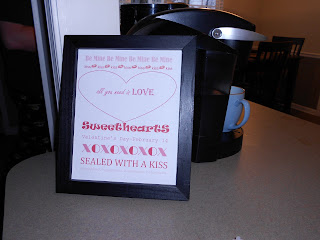
This one is just a modifier for my "Pinterest" friends! I loved the Subway art that was pinned on there through eighteen25.blogspot.com. The only problem with it (and it's really really cute, so the ONLY problem) is that I'm cheap and didn't want to buy a new frame - because I don't have a frame that size just hanging out at my house. I do, however, have several empty frames around my house that are quite a bit smaller. SO I decided to take the idea and make it a bit more "homemaker friendly!" Below is my own adapted version of the cute Valentine's Day Subway art and loose instructions on how to do this yourself.
 |
| As you can see, mine is different in that I put a few designs into it and the letters don't all meet top to bottom, but I'm still happy with it! |
 |
| Close up of the bottom since it was kind of hard to read |
 |
| cute and understated |
1. I went to Microsoft Word and created text boxes all the way across the page which I then typed the first two lines in. I played with different fonts as I went, trying to give a different feel to each line.
2. I found the "kiss lips" in the clipart and after I had one sized and placed I just copy and pasted it repeatedly in between the words). The good thing about using the text boxes instead of just typing lines is that you can get the bottom of one line a bit closer to the top of the next line.
3. Go under "insert" and then "shape" and choose a shape you like and size it. (for me it was between the thought bubble and the heart...I ultimately stuck with the heart since it's Valentine's Day art!)
4. Insert a text box and the words into the shape you like and size it so that you can's see the text box outside of the shape border.
5. Repeat step 1 to fill the rest of the page
6. I played with all the different variations of the red and pink color wheels for each text line (you select the "color" section from the toolbar and then go to the bottom where it says "more colors" and it will give you a honeycomb of colors. I don't think I repeated one single shade exactly.)
7. I set both the fill colors for my inserted shape and the internal text box to white, as well as the outline for the text box.
8. PRINT, measure and cut accordinly to you your frame size (mine is an 8x10, so I really just had to cut the margins off).
9. Pop it in the frame and put it on your counter...DONE!
*In order to do a picture that is smaller, just go under "Page layout" and make the margins larger- this will make your print range smaller and help you get the measurements to fit the actual frame size.*
I hope you guys enjoy! I've got a few more ideas that I will be trying soon, so keep looking and I'll keep updating :)
No comments:
Post a Comment